
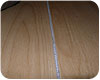
A common heat welding mistake is shown here: no radius at the base. The side of the groove was cut square, and without a radius at the bottom of the groove the weld will fail.
Heat welding is an art when performed by an experienced professional. All installers should pay strict attention to the job conditions, and know what to do when challenges arise. Heat welding can be tricky even for veteran installers, especially when it involves flash coving, inside and outside corners. On the other hand, few installers with little experience can go out to a job site and complete a successful heat weld.
In my travels dealing with commercial resilient concerns I am constantly encountering failures stemming from the heat weld process. Not surprisingly, what usually undoes a heat weld is an installer looking to cut corners or take shortcuts. The best heat weld jobs take time and patience to complete successfully. Here is a list of common mistakes that can lead to heat weld failures:
Straight Edge and Butt:The straight edge and butted seam is used by a lot of installers. When using this method they often do not realize the seam edges are gapped in some areas and tight in others. When the groove is cut in the seam where the edges of a seam are not evenly spaced or the groove is not centered on the seam, it will leave one side of the groove without radius at its base. The radius at the bottom of the groove is extremely important to the integrity of the seam weld. Without the groove at the bottom of the material, there is undue stress to the seam edge, which usually results in a weld failure.
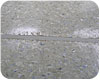
Groove Cut Too Deep:The depth of the sheet vinyl groove is specified by manufacturers to be a half to two-thirds the thickness of either the material wear surface with a backing, or the thickness of vinyl-backed material. With vinyl products, problems occur when the installer does not adhere to those specifications. I have seen grooves cut completely through the material into and through the adhesive line into the substrate. Many installers confuse linoleum seams with vinyl seams; linoleum seams are grooved down to, but not into the jute backing. If that is done with sheet vinyl the seam will likely fail.
Groove Cut Too Wide:There are several diameters of weld rod available in the marketplace. If a groove is cut in the material too wide for the rod, the weld will be compromised. It is necessary for installers to double-check the rod width prior to grooving.
Contamination of Groove:Some installers will groove the entire area prior to heat welding. This exposes the seam to possible contamination from dirt getting into the groove. The grooves can also be contaminated from construction traffic or from sweeping the grooves with a broom that has been contaminated with some type of sweeping compound. Likewise, the groove can also be contaminated when they are covered with tape – from adhesive residue reducing the rod adhesion in the groove.
Pictured is another common error: a groove cut down to the substrate. When a groove is cut too deep, it can lead to failure.
Poor Heat Setting:Allow the heat welder to thoroughly heat up. Don’t be like some installers that will start to heat weld before the unit is totally warmed up. Working with a heat weld unit not up to working temperature will cause scorching of the material’s surface. The heat welder also needs to be set high enough to thoroughly melt the weld rod. Failure to do so will result in a poor fusion. The temperature setting can spell the difference between a good fusion and a poor fusion. Another factor is the temperature of the substrate. A cold substrate requires more heat. Obtaining the correct setting requires experience on the part of the installer.
Moving Too Fast:Installers weld at different rates of speed. They need to know their speed and work at a speed consistent with their heat setting. Installers that change speeds will find the integrity of the weld will change along the seam. These changes can range from scorching to poor fusion.
Sudden Movement of the Welder:An installer will generally reach out and pull the heat welder toward his body, causing movement. When moving the welder it is necessary to maintain a constant fluid motion. Any sudden movement will cause a jump at the weld tip, which will generally leave about a 2” loose spot resulting in a weld failure. If this happens the installer needs to remove that section and re-weld it. It is a simple process often overlooked.
Take care to keep the temperature levels consistent throughout the heat welding process. The picture shows scorching from too much heat, which can cause distortion of the urethane wear surface.
Moisture Condition in Slab:Moisture in the slab will migrate towards the seam. If that condition exists, it can cause moisture vapor that will stop the thermo-fusion process from thoroughly taking place.
Crowding One Side of the Groove:Some installers tend to hold the heat welder on an angle, crowding one side of the seam. This will cause the seam to be weak along one side of the seam. The heat welder should be held straight up with a firm, but not hard, pressure on the weld tip. Too much downward pressure on the tip will tend to stretch the rod. When it cools the weld rod tends to shrink and can create undue stress to the weld.
Improper Weld Tip or Use of Tip:Weld tips should be designed for the rod and type of material being welded. The flow of the heat must be focused at the bottom of the groove as well as heating the rod. One of the worst problems with the hot air distribution is too much hot air wash, scorching or distorting the wear surface coating of the sheet material.
Skiving Too Early or Too Late:The skiving process needs to be done in two passes. Some installers try to eliminate the first pass to save time but the end result is not worth cutting corners. The timing for the first skive is determined by the material being heat welded.
For linoleum, skiving should take place almost immediately while the weld rod is warm. The same needs to happen with the second pass. Linoleum can be skived while the rod is warm, since linoleum is a thermo-bonding process and not a true weld.
On the other hand the skiving of the first pass in sheet vinyl seams need to be delayed until the material is cooled, normally 10-15 minutes. The final pass should be done when the seam is thoroughly cooled, normally 20-30 minutes. Situations where the final skive has been rushed create a seam in a vinyl product that may be severely concave. Heat welded seams will often have a minor concaving, but severe concaving will result in a maintenance issue.
Report Abusive Comment