


FCI is pleased to announce the winners of its second annual FCI Installation Awards, honoring the best and most creative installations of the past three years in a wide range of floor covering projects for both residential and commercial settings. One entrant, Joe Rocco of Artistic Floors by Design, took home his second award for the second year in a row.
The winners are:
- Lance Ortegel and Eric Ullrich of Lance’s Professional Installations and Inspections, Commercial Carpet
- Mark Fenstermaker of Western Tile & Marble, Commercial Ceramic Tile/Stone
- Fred Richardson of Cutting Edge Flooring, Commercial Resilient
- David Griego of Insider Floorcovering, Residential Carpet
- Mark Zepplin of Zeplations, Residential Ceramic Tile/Stone
- and Joe Rocco of Artistic Floors by Design, Residential Hardwood/Cork/Bamboo.
In this issue we will cover the residential winners. See our January/February 2016 issue for full coverage of the winning commercial projects.
Joe Rocco—Residential Hardwood/Cork/Bamboo:
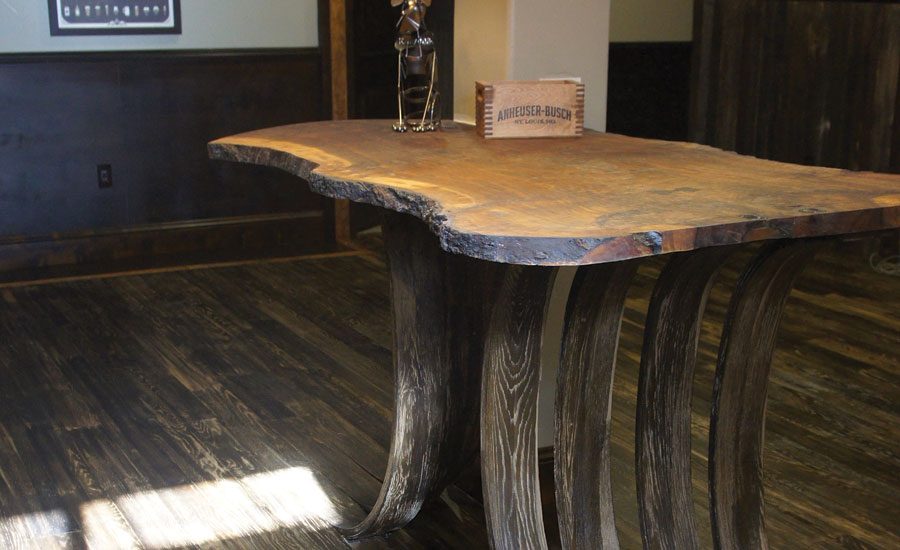
For his second award-winning entry in two years, Joe Rocco of Artistic Floors by Design created something unique in the basement of his Parker, Colo., home over a period of six months: a handmade table with seven curved legs that seem to rise out of the flooring itself.
“This was something I’d been thinking about for a year and a half or so,” Rocco stated. “Jeff Fairbanks at Palo Duro and I were having a conversation, and he said it would be really cool if a floor served more than just a utilitarian purpose. It really got me thinking, and one day I thought, ‘Wow, what if the floor actually swept up somehow and was the legs of a table?’”
The flooring is white oak that Rocco wire-brushed, dyed and glued down to the concrete with a moisture barrier. He left out a four-foot section to blend the legs and flooring together. To create the legs, he had white oak cut down into strips. “I came up with a curve and made a template, then soaked the strips so they would be more malleable and pliant.”
He soaked these strips—five strips for each leg—in Windex for 24 hours each. “If you use straight ammonia it turns the wood a grayish color, but Windex has just enough ammonia to get the same result but you can sand out any coloration issues,” he explained. “Then I put the strips in a jig to make the curve of the legs. The following day I would take them out of the jig, glue them together, then put them in another jig with a little tighter curve and let them set up for two days. Then I took them out, stripped out the glue and cut them to length.”
Wire-brushing the legs was a challenge, Rocco noted. “The curvature created an interesting dynamic of how we got them wire-brushed. We had to go through a lot of hand tooling and proprietary texturing that we wouldn’t necessary go to the lengths of if this had been a standard flat floor. I wanted the wire-brushing and the dye to be as close to the flooring as possible, so it had continuity.”
When it came time to blend the flooring and legs together, he cut the flooring near the legs at an angle to match the curvature of the legs. “It makes it look like the legs are coming up out of the floor.”
Asked about having an unmovable table in his basement, Rocco said its permanence was the point “as a statement against disposability.” Already, a client is interested in having Rocco make her a similar table. “The client came downstairs and immediately said ‘Whoa, whoa, whoa! What is that? I want that in my house.’ It’s validating to go from something that went from being personal and a little outlandish to something that people want in their homes. It took me a long time, and I wasn’t sure if it was really going to be doable.”
Rocco thanked the National Wood Flooring Association (NWFA), where over the years he learned advanced techniques for working with wood. “Everything the NWFA teaches you can be used in any other aspect of woodworking. Picture-frame building, hand rails, mill posts, balusters, deck building—you name it; the skill set is ubiquitous.”
Find out more about Rocco’s company at artisticfloorsbydesignonline.com.
David Griego—Residential Carpet:
David Griego of Insider Floorcovering, Brooklyn Park, Minn., recently put together a special carpet for an even more special client: his daughter, Izzy. The carpet, made up of more than 100 squares seamed together in a 13 by 13 bedroom and closet, features a grid of hand-created logos and symbols, including Izzy’s name, stars, hearts, team logos and even a Hello Kitty face.
“It was a very simple layout, but it was very time consuming—it took a week to complete. It’s not as flashy as some designs out there, but it was pretty technical. I went through a whole bag of glue sticks and two bottles of seam sealer. I counted 139 seams total. It was fun.”
The carpet was taken from scraps he saved from jobs over the years. “It’s a plethora of different types of carpet. Some of these carpets were a lot thicker than others, but I managed to make it work.” He is used to doing custom jobs for higher-end clients, and was extremely happy to be able to put his skills to work for his daughter.
“My wife even got in on the action a little bit. I had the seam iron out a lot and she did some of the seams herself. I only had to reburn about half of the ones she did,” he said with a laugh.
For the logos and shapes, he drew out the patterns, made a template and spray-painted it on the back of the carpet. Then he used that paint as a guide to cut out the pieces. “I used all different colors of carpet. Getting everything right in the squares was the hardest part, and seaming it all together was time-consuming—but it was all worth it.”
Mark Zepplin—Residential Ceramic Tile/Stone:
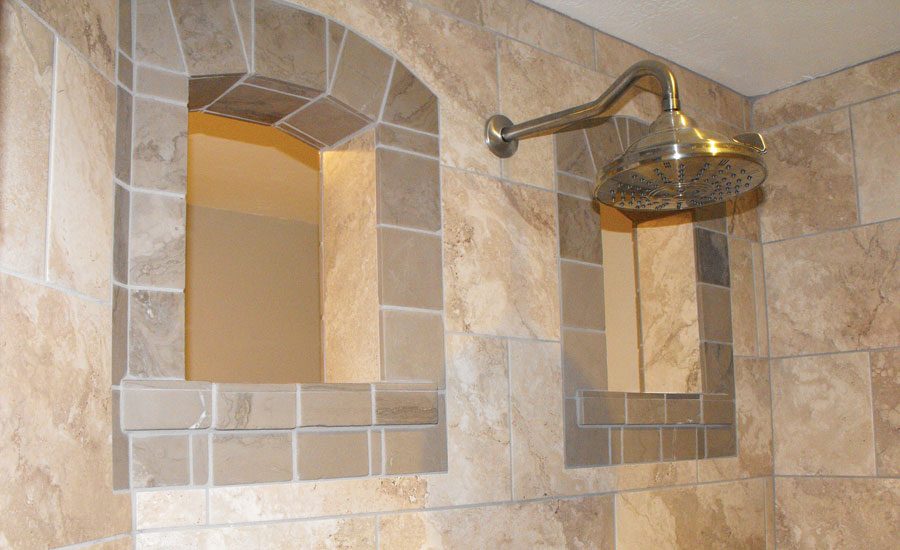
Mark Zepplin of Zeplations, Waupaca, Wis., specializes in master bathrooms. For his award-winning installation in a private residence on a lakefront property, he was tasked with gutting an old, sunken hot tub and old molded shower module, with the concept of “bringing the outdoors in.” He replaced the old bathroom with a custom shower and tub, full of “soft curves blending from one area to the next, heated floors and a porcelain mix with stone trim.”
Since he is so used to working with both porcelain and stone, Zepplin said the most challenging part of the installation was coordinating all the trades—the project took 26 days to complete between him and one helper, and comprises about 600 square feet. “I met with the carpenter, plumber, electrician, furnace man and homeowners. It was important to have a timeline for all involved so the project would not be too disruptive for the people living there.”
The installation features a curved bench, an Old World stone tile-trimmed niche, two open window-like openings with a shower head between them, and a bath area with no sharp edges to bump into. The shower itself features a poured, 40-mil reinforced sloped pan built to Tile Council of North America (TCNA) guidelines.
Zepplin said one of the most important steps of building a master bath is simply understanding how the water will flow. “The better you understand the water flow, the better you’ll know how to lay the tile.”
He added that attending trade shows and training is essential to keeping on top of the latest techniques and technologies. “You’re so sure you know everything, but I’ll go to this little seminar and a young guy is telling me about something new—something I can incorporate into my own installations. The more I know, the better I can make these projects. The more everybody knows, the better it is for the industry. A young installer getting paid more makes it better for everybody. None of us should ever stop learning. It just makes for better competition.”

Report Abusive Comment