Wood or Wood Knot
Our industry continues to promote "custom installations" of the ever-increasing number of hardwood flooring products and species now available. Whatever the complexities involved, this particular aspect of flooring installation offers us an opportunity for renewal. Even the most seasoned installer can embrace these jobs as a chance to add a little spice to his career. When well done, a custom installation can also be a recipe for success, because it will help serve up future installation work.
The potential for custom installation growth is not just a byproduct of the installer's talent but also with the consumer willingness to pay the price for this level of expertise. There really is no way to gauge the actual number of installations that would fall into the "custom" category. I estimate that 5 percent would be considered a generous market share. So, it's no wonder manufacturers stress training that covers the basics as opposed to more custom applications. And obviously, installers must be thoroughly trained in the fundamentals before they tackle "fancy" jobs. Years of experience is no assurance of true expertise in any endeavor. Knowledge is power. Ignorance can be a potential curse. Hardwood flooring complaints usually involve basic, not advanced, installations.
Still, while some may be a little leery of custom work, the process of installing a nail-down solid wood floor is not rocket science. The trick is to know your fundamentals and get comfortable with the power tools. Too often, many precautions against failure are neglected-and that can leave behind an installation picture not suitable for "framing." With that in mind we offer a few handy tips that should prove helpful on a nail-down job.
For starters, remember that the proper subfloor is essential for limiting movement. Once in place, it should be thoroughly inspected for structural integrity and to ensure it is sufficiently nailed to the floor joist. Check for "Crowned/High" joist using a straight edge, then grind it or patch it as needed with a leveling compound. The subfloor material should also be rated and approved by the APA (American Plywood Association). Don't forget to check the moisture content as well. The variance in moisture content between the subfloor and the hardwood flooring should not exceed 4 percent.
I would also recommend using 15# asphalt saturated paper as a moisture deterrent and to help minimize squeaks that can develop from direct contact of the hardwood flooring to the subfloor. After the paper has been laid and lapped at the paper seams, strike chalk lines directly over the joist below. Historically, joists are spaced 16 inches apart and are installed parallel to the short side of the foundation walls. The hardwood must be installed perpendicular to the joist to add strength and minimize the potential for a "wave or roll" appearance in the hardwood flooring after installation.
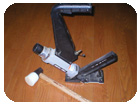
The fastener of preference is a 2-inch "L" or "T" serrated cleat which can be dispatched using either a manual or pneumatic nail machine. Along the starting and ending rows of the flooring installation, a 2-inch finish nail or a pneumatic face nailer is required because of the obstruction of vertical walls preventing the operation of 45-degree angle nailing machines.
The following recommendations are considered the industry standards for nailing hardwood flooring products:
- Establish a chalk line along the long wall of the installation for your starter rows to assure that they are parallel and straight. Install the first two rows of flooring by attaching the flooring to the subfloor with finishing nails or a face nailer. Continue the installation with a floor nailer. When racking the flooring, avoid "stacking" the end joints to the adjacent row of flooring. Spacing of these end joints should be greater than six-inches whenever possible. The number of "shorts" in the bundles will dictate the spacing achievable.
- Use established chalk lines directly over the joist that were snapped on the 15# saturated asphalt paper as one of your focal points for nailing. Then, nail in the center between your snapped chalk lines. This will assure that you follow the recommended nailing schedule of 8 to 10 inches apart.
- Secure a fastener between 2 to 3 inches from the end joints. Hardwood flooring that is "tightly" milled will periodically require a few whacks from your nailing machine mallet. These mallets are rubber capped to avoid damaging the side and end match of the hardwood flooring. The mallet also has a hardened steel end as well for applying taping pressure at the end joints for a potential gap. The pressure should be minimal and always applied to the tongue side of the end joint. Occasionally, boards may require some "assistance" in drawing up tight to the previous flooring strip or plank. One suggestion is to take smaller "bites" and decrease the distance between fasteners while simultaneously applying additional blows with the mallet to the areas where fasteners are to be secured.
The following are additional tips or tricks of the trade that you may find useful:
- Even if you can't "dance," you'll need a bit of "rhythm" when using your nailing machine. Get comfortable with it. Fall in love with it. Relax when grasping the nail machine and the mallet.
- Gently "glide and slide" the machine along the edge of the flooring. Avoid picking up the machine whenever possible. Before long, both you and the nailing machine will be waltzing down a pathway of hardwood.
- Create "racks" of hardwood in a stair step layout. Once a section of the "stairway" has been completed, proceed to the next adjacent rack. Installing flooring without racking will require more walking which means less productivity in nailing.
- Your feet and your mallet should be enough to position the flooring material, so avoid reaching down and positioning the flooring with your hands. You can win the installation battle mostly by "dragging and kicking" as opposed to continually bending down or, worse, kneeling. To avoid fatigue, break up this dance by racking out about three feet at a time. Nail a section of the flooring and then return to building your racks again.
- Follow the recommended nailing schedule to avoid "over nailing" which can create waves and or rolls in the installation. You can become extremely "proficient by nailing sufficient."
Also, remember that nails can not prevent seasonal changes or excessive moisture conditions on a floor. If the hardwood needs to move to accommodate these conditions, it is going to move and all the nails in the world won't stop the behavioral change. Wood or Wood Knot knows you can learn to "dance" through your installations and by the way, "Nice Moves."
Looking for a reprint of this article?
From high-res PDFs to custom plaques, order your copy today!


