Technical Focus
How to install a beautiful and functional stall shower
It is important for installers to follow guidelines found in the TCNA Handbook or recommendations from the manufacturer of a shower system to ensure a successful shower installation

One of the more important, and most times not provided part of a conventional shower base, is probably the smallest part of the Handbook detail B415. (shown)
Photos courtesy of Tile Council of North America

According to the Handbook, curbs may be constructed from framing lumber (not treated lumber) or a cementitious base, which is covered with the shower pan membrane, galvanized wire lath and mortar.

They can also be built with one covered with a preformed foam curb cover.

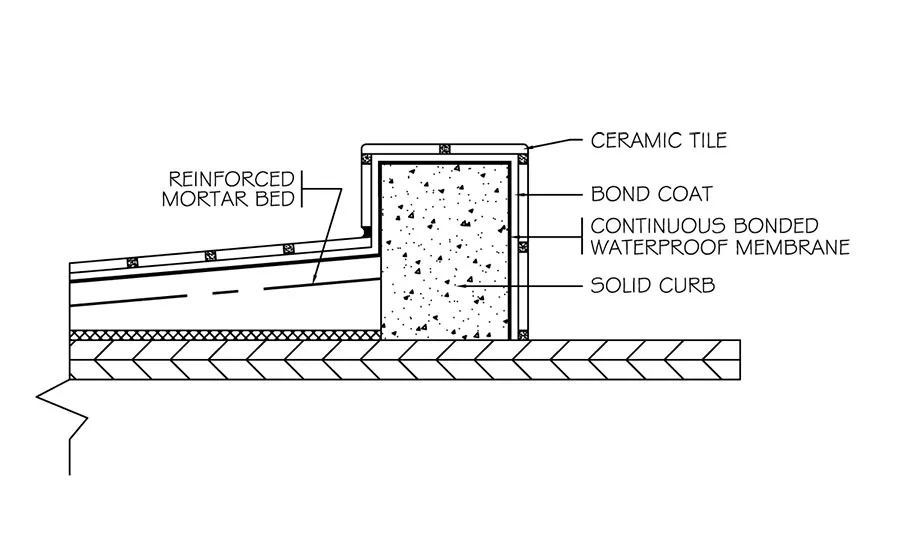
A third approved method is a solid masonry curb, which is covered by a continuously bonded waterproofing membrane.
For a beautiful and functional stall shower to stand the test of time, the installer needs only to fulfill one obligation: direct the water coming out of the shower head to the drain without taking any detours. This may sound overly simplistic, but at the end of the day, that is what needs to be accomplished.
Let’s begin building the shower from the bottom up and determine what is required to achieve success. The first and pivotal building block is a competent installer.
Installer qualifications
For the shower to function successfully, it must be installed correctly following the guidelines contained in the TCNA Handbook or the recommendations from the manufacturer of a shower system. Unfortunately in the U.S., we don’t require tile installers, or in this case shower installers, to be trained in the tile industry best practices, attend a product manufacturer’s training and become proficient in the installation of their products, or follow a particular Handbook installation detail. To overcome this obstacle, the best route is to interview and hire a tile installer who has been certified in his or her craft and continues to stay current on new and ever-changing products and installation methods.
Another way to qualify the skills and knowledge of the tile installer, or any contractor for that matter, is to use the Ceramic Tile Education Foundation (CTEF) “Contractor Questionnaire,” which is available free of charge at www.tilecareer.com under the “Consumer Help” tab.
Work done by other trades
Some of the components of a stall shower are not provided by the tile installer, but are put in place by other trades. In a shower remodeling project, many times the builder or remodeling contractor will tear out the water-damaged subfloor and framing, (Gee, I wonder why that damage occurred?) and replace them with better products.
The mindset of many carpenters who encounter rotted shower assemblies is to go into overkill mode and replace the damaged wood with treated framing lumber, which is designed not to deteriorate in water-laden areas. On the surface, this sounds like a good idea, but in actuality, it is a very bad idea since it creates an entire set of new and unsuspected problems. Most treated lumber, by nature, has a high moisture content, which when encapsulated by a shower pan liner (membrane) or waterproofing product, will twist and warp. This movement can destroy an otherwise perfectly constructed curb or shower pan and should never be used.
There have been numerous questions raised as to why the TCNA Handbook does not list treated lumber as an acceptable replacement product, or better yet, forbid its inclusion in the shower assembly since it is such a problem. Actually, the Handbook does address the issue, in a rather circuitous manner. The fact that treated lumber is not called out or listed in any Handbook shower detail is actually saying that it is not recommended. If it were, it would be listed as an acceptable component.
When the tile installer has successfully convinced the carpenter not to use treated lumber, the real work can begin. Here, the installer has a wealth of possibilities from which to choose. Will the shower be an unbonded water-containment membrane with a conventional mortar bed using the time-tested water in-water out system, or will it be one of the manufactured shower systems using a bonded waterproof membrane meeting ANSI A118.10? Both methods, when properly installed, work well and will provide many years of uninterrupted service. But the key here is the word “properly,” which takes us back to hiring the most qualified person to complete the task, rather than the least expensive jack of all trades.
The conventional mortar bed shower pan
One of the more important, and most times not provided part of a conventional shower base, is probably the smallest part of the Handbook detail B415. The eliminated part is the little wedge-shaped space called “sloped fill” under the shower pan membrane. This sloped fill must meet the plumbing code requirement of 1/4 inch per 12 inches, and can be provided by using wire mesh and mortar or a factory-manufactured sloped product. The sloped fill creates the necessary pitch, which directs the water to the weep holes and down the drain. When not provided, the trapped water becomes contaminated with shower water by-products, including soap, shampoo, cream rinse and body oils. This trapped solution ferments below the floor and can produce very unpleasant odors.
The shower pan membrane, normally a sheet material, is loosely laid over the sloped fill, which extends up the wall to a height of 3 inches above the curb or 6 inches above the floor in showers with no curb. The membrane is folded, properly sealed and attached to the studs. At the drain, the membrane is carefully cut to the drain opening, sealed to the lower drain body and connected to the drain body by use of a clamping ring.
The single component, which many times is the source of a shower failure, is the curb. According to the Handbook, curbs may be constructed from framing lumber (not treated lumber) or a cementitious base, which is covered with the shower pan membrane, galvanized wire lath and mortar, or one which is covered with a preformed foam curb cover. A third approved method is a solid masonry curb, which is covered by a continuously bonded waterproofing membrane.
Unfortunately, too many ill-trained tile placers (not skilled installers) have devised their own shortcut, which consists of fastening backer board to the curb by driving nails or screws through the membrane and into the wood framing. With the membrane now compromised, water has direct access into the wood — better known as a future failure. This scheme should never be used, period.
Now the shower pan membrane is complete and ready for the mortar bed, well almost. In virtually every township, city or borough, the local building code requires the pan to be flood tested. This test places a specified amount of water in the completed pan, usually 24 hours, to determine that there are no water leaks. The local plumbing inspector would normally verify the successful test result and issue the appropriate approval sticker or tag. In the communities that do not have this requirement or don’t enforce it, the quality-oriented tile installer should conduct this test for his or her own peace of mind and that of the consumer.
Bonded waterproof membrane shower pans
A bonded waterproof membrane, or sealed system, is completely different than the conventional mortar bed system mentioned above. There is no sloped fill or clamping ring drains. In this system, the shower floor is sloped to the drain at the required 1/4 inch per 12 inches being fabricated of mortar, or one of the manufactured foam floor products which likewise provide the appropriate slope. The membrane is attached to the base by using the manufacturer’s recommended adhesive or mortar. Due to differing methods, always follow the membrane and integrated bonding flange manufacturer’s instructions for connecting the membrane to the bonding flange.
The curbs in these systems are normally made of foam, which is bonded to the floor and shower base and covered with an ANSI A118.10 membrane. With these shower base systems, it is vitally important that the manufacturer’s recommendations are followed completely. Cutting corners or developing “hybrid systems” will void the product warranty and may be the cause of a potential failure.
Waterproofing the walls
When completing a shower using the water in-water out system, the Handbook shows the use of an optional waterproof membrane on the walls. While being optional, it is advisable to waterproof the entire shower stall, which eliminates the potential of water infiltrating the wall cavity.
On the sealed systems using the integrated bonding flange, the Handbook states that the waterproof membrane must extend to the full height of the tile assembly. It further states that the bonded waterproof membrane must be continuous, including changes in plane, and follow the manufacturer’s requirements on corners, seaming and overlap.
Another practice, which can serve both the tile installer and the consumer well, is to use installation materials that are provided by just one manufacturer, when possible. Using this scenario, the manufacturer’s products, which are designed to operate as a “system,” ensure a trouble-free installation rather than a problematic hybrid.
Build it correctly the first time using tile installers who are certified and all involved will enjoy long-term success.
Looking for a reprint of this article?
From high-res PDFs to custom plaques, order your copy today!