How to Create a Winning Entry for Your FCI Installation Awards Submission

There are plenty of installers and contractors out there who have considered submitting to FCI’s Installation Awards, but everyone is under the gun to wrap projects, and time is money, right? Here are some time-saving tips to help you submit your project and gain more exposure on your flooring installations and help us spotlight the craftsmen and women in our industry.
Step 1: Take Good Photos
Taylor Adhesives has been with us every step of the way for several years now, and for last year’s Installation Awards, the Taylor team produced a three-part series to help you take better jobsite photos. These videos will help you not only take better photos, but they will also help you build your work portfolio to bring in more business and provide you with great submission photos.
Taking Good Jobsite Photos: Part 1 provides four steps that often get overlooked—clean your jobsite, clean your lens, shoot horizontally versus vertically and how to use gridlines. Part 2 dives deeper into honing your photography skills by showing you how to change up shot height and angle. It also explains shooting with a wide angle and utilizing the two zoom options available on most smart phones. For those of you interested in becoming photo pros, Part 3 covers focus and exposure which includes navigating lighting and reflections.
Step 2: Make List of Project Information
To submit your project to FCI’s Installation Awards, you will need to list:
- everyone who worked on the flooring installation
- the location and type of project
- the distributors, manufacturers/suppliers, retailers you worked with
- products used (i.e. flooring name, adhesives, flooring accessories, etc.)
Be sure to jot down all of this information beforehand so you can get through the entry form quickly. If you are confident you can recall everything from memory and fill out the form in one fell swoop, go for it.
You will be asked to describe any outstanding or unique features of the installation. This can be anything.
Last year, Ken Ballin’s turtle scribe shower was all done by hand. Greg Skafec’s resilient project was one enormous piece of sheet vinyl. Roland Thompson installed carpet inside an off-gridder’s dome house. Matt Garcia installed a custom entryway out of leftover pieces of wood to create a surprise for the customer. Wentz Custom Rug Co. handcarved a custom rug for Southern Arkansas University. H.J. Martin and Son installed a custom resilient design in a new build. J&R Tile, Inc. designed a courtyard that included a surround of engraved slate stone tiles. Laticrete and Jason Roberts Services crafted a gleaming white, polished auto showroom and event space floor.
The sky’s the limit here folks. Take a few minutes to think through your project. What sets it apart from other installs?
Step 3: Size Your Images
You need a minimum of two color images with a max of four. Each image should be in either a .jpg or .gif format and at least 4032 x 3024. Most smart phones are set to take high resolution images already; however, some older phones and especially flip phones aren’t capable of taking high enough resolution images for submission.
If you are not sure what size photos your phone is taking, open your Photos app on your iPhone and tap on an image. At the bottom of the screen there is an icon that is an “i” inside a circle with two tiny stars on it. Tap that. Inside the info box, you will see the photo dimensions. All of your photos will be this size unless you have altered them at some point.
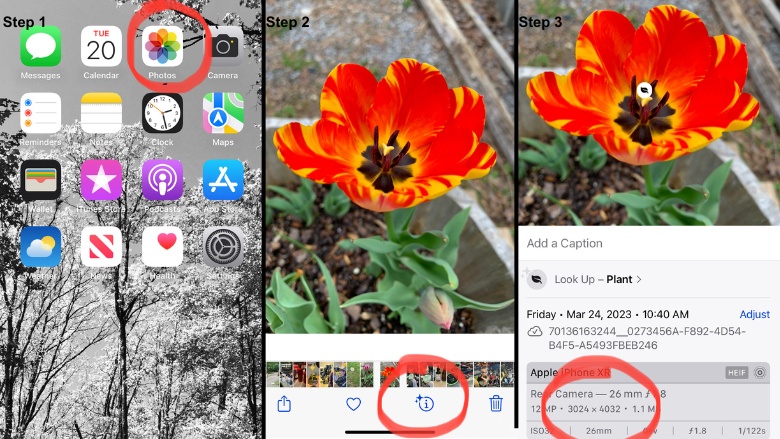 Step 1: Open Photos app. Step 2: Tap info icon at bottom of screen. Step 3: Photo size is located in info box. The steps for each iPhone model may differ slightly. Photos: FCI.
On an Android, go to your Gallery and tap on a photo. There will be “…” (three dots) on your screen. Tap on "Details," and you will find your image size.
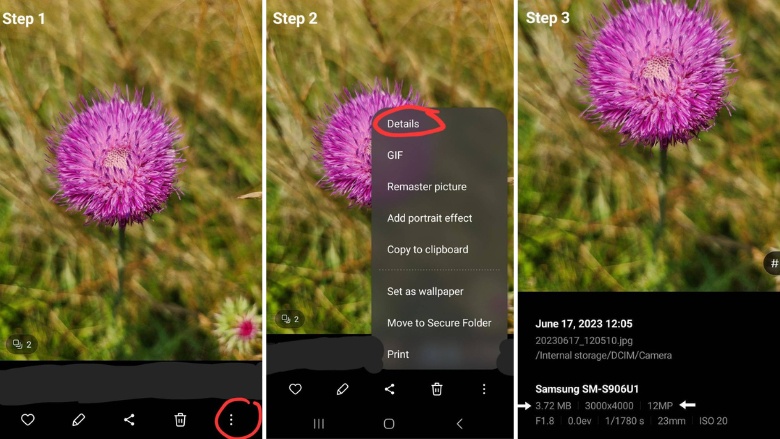 After locating a photo in your Gallery, Step 1: Tap on the three dots at the bottom (or top). Step 2: Tap "Details." Step 3: Photo size is located in info box. The steps for each Android model may differ slightly. Photos: Jenny Holcomb.
A good rule of thumb is to aim for 2 to 3 MB per upload. That is also listed in the same info box as the dimensions. Make sure one of the photos is of the overall finished project. Other photos can be of certain details of the installation.
Step 4: Upload a Video (Optional)
This year you can upload a video of your project. If you choose to go this route, be creative! Feel free to narrate as you walk the project, talking about the process and what all you had to overcome to get the project completed on time. If your file is too large, you have the option to upload it to Vimeo, Dropbox or Google Drive and share a link with us.
Step 5: Submit
Be sure to read over your info one last time, ensuring that names, brands and titles are correct. Hit “Submit”! You have until 11:59 p.m. EST on August 31 to enter.
Remember…no project is too big or too small. The point is to showcase your work so others can see the numerous professionals we have in the installation community.
Also, there is a chance to win category-specific prizes this year. A first! QEP/Roberts has donated tools and swag to give away to first, second and third places. So, get those projects submitted folks! The clock is ticking.
Submit your projects here.
Looking for a reprint of this article?
From high-res PDFs to custom plaques, order your copy today!


