CTEF Tile Tip: Is it Time for a Tool Tune-up?

Photo: Getty Images.
Having top-quality levels and lasers in your toolbox is a great asset and one that can save a significant amount of time when completing a layout. But like the check engine light on your vehicle, these tools may need a checkup from time to time and possibly a tune-up.
The first question asks, is your level providing level and plumb lines? To verify the level’s accuracy, place the level on a flat horizontal surface like a countertop. Draw a pencil line on the long side and at one end and read the location of the bubble. Without flipping the level over, rotate it 180 degrees (end for end) and place it on the same pencil lines. The bubble should be in the same location as previously viewed. If it is, you are good to go. If the bubble is on the opposite side of the line, you should take a screwdriver and hammer to destroy the bubble tube. This may seem extreme, but do you want to chance using a level that is not accurate on your next job?
To verify the plumb bubble(s), place the level on a vertical surface placing marks like the marks drawn on the countertop. Read the bubble position and rotate the level 180 degrees. The bubble(s) should be in the same position, and if so, all is good. If not, follow the advice above. Congratulations, your level is now verified.
For your laser to operate to peak efficiency, be sure to have a fresh supply of batteries or the appropriate charger. You now have the laser ready for today’s work, but is your laser providing accurate plumb and level lines? We assume that it is always ready to go, but is it? The laser can be confirmed for accuracy by checking its lines against a verified superior quality level as seen above.
Place the verified level on top of a ten-foot straightedge and strike a line on a flat wall. Next, align the laser to that line. If the laser follows the line perfectly, you are ready to go. If not, double-check your level line. Still not good? Stop using the laser.
If a verified level is not available, use a water level to confirm your laser’s accuracy. A simple water level consists of ten or twenty feet of 3/8” or 1/2” clear plastic tubing and clean water.
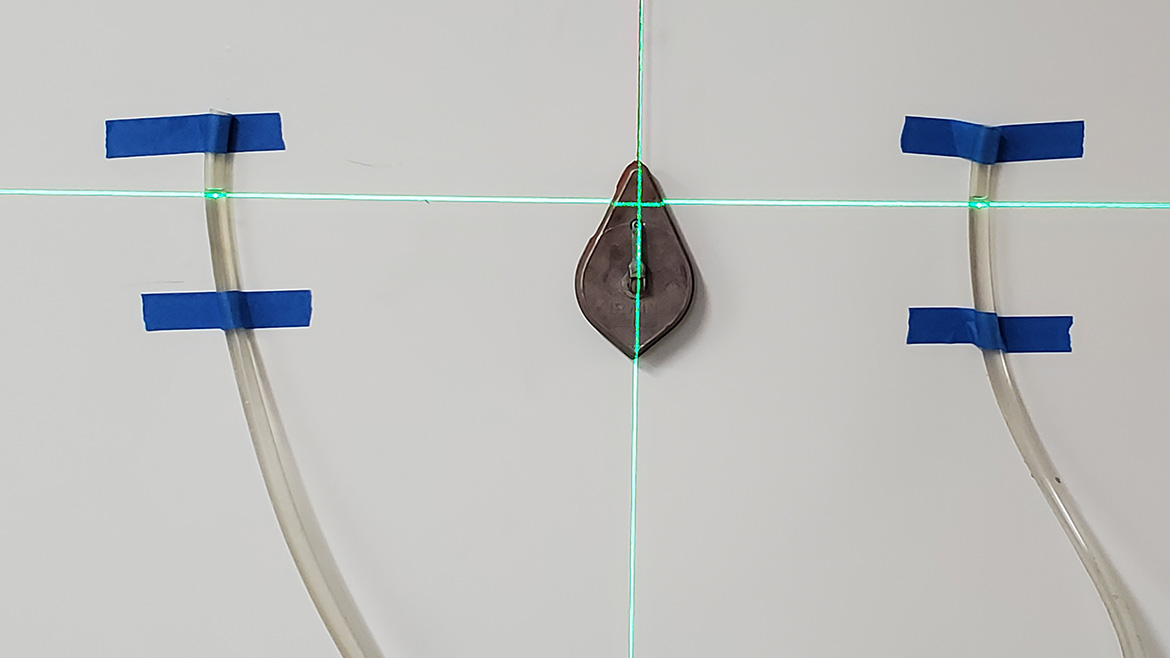
Water level confirms laser accuracy. Photo: Scott Carothers.
Fill the tubing from one end allowing the water to fill the tube. Be certain there are no air bubbles in the tubing. Fill the tubing to about two inches below each end of the tube. Hold the two-tube tops side by side and flush with each other. Place a fine pencil or pen mark at the top of the water line. Tape one end to a wall while holding your thumb on the other end. Move to the left or right the length of the tube. Holding the tube at about the same level as the other end, carefully remove your thumb and allow the water to settle. Move the tube up or down slowly until the water line hits the mark on the tube. Tape the tube to the wall so that the mark and water line are aligned. Position the laser on these two marks and if the laser hits both water lines, the laser is accurate.
To verify the plumb line, use a plumb bob suspended from the ceiling. The laser should be perfectly aligned with the string.
If one or both tools are not accurate, contact the manufacturer(s) to determine if it will recalibrate your tools at no charge (most better-quality manufacturers will do this) or for a small fee. Good tools pay dividends.Looking for a reprint of this article?
From high-res PDFs to custom plaques, order your copy today!