The Hidden Challenges of Ceramic Tile Patterns
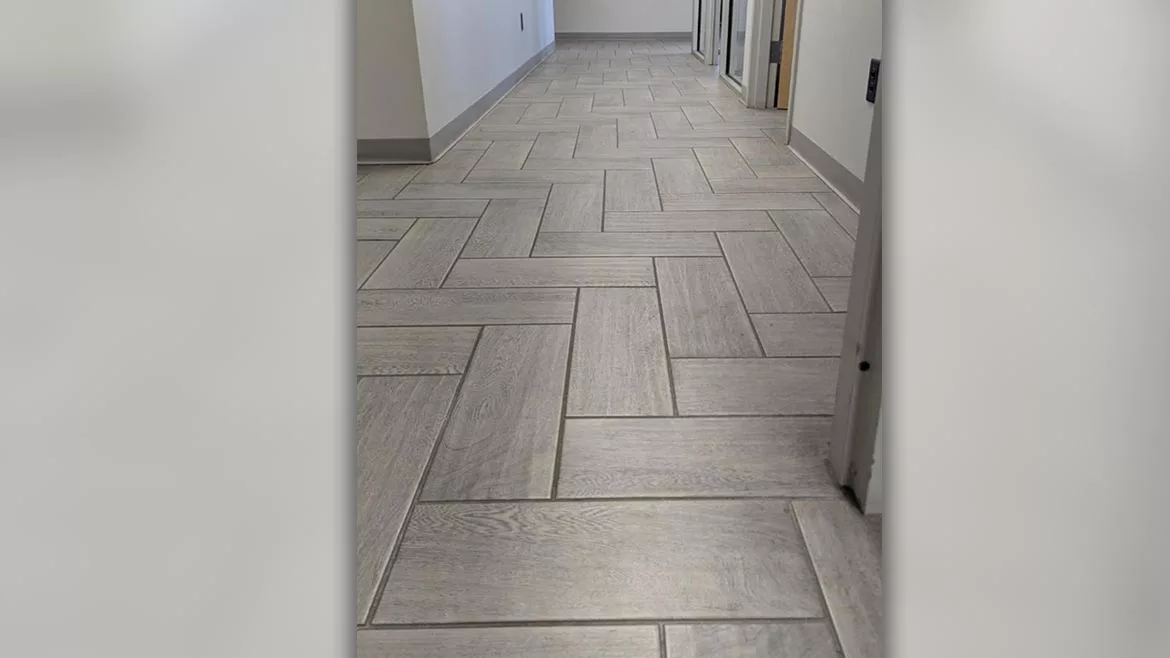
At first glance, this herringbone pattern seems acceptable. However, closer inspection reveals misaligned long-side grout joints that drift rightward, compromising both the pattern's visual integrity and proper installation standards.
Photo: Scott Carothers.
Many installers have found themselves in this situation. The consumer and/or designer have selected a tile for their project based solely on color and design. All is well until the pattern is selected, which in this case is a standard (straight) herringbone. This is where the selection and design issues begin, as we shall see.
ANSI A108T, Standard Terminology of Tile Assemblies, System Modularity states: Tiles of various nominal dimensions are sized so that they may be installed together in patterns with a common specified joint width.
According to ANSI A108.02-4.5.3.1, if the design professional specified a modular pattern utilizing tiles that are not manufactured to be installed in a modular pattern, it is the responsibility of the design professional to verify system modularity and specify the grout joint size for the pattern based on the actual tile size. If the specified grout joint width is not possible due to size variations in the actual tile supplied for installation or because of the site conditions, the tile contractor shall be permitted to reasonably adjust the pattern. Tile shall not be field cut to size to accomplish modular patterns in any circumstance.
For a tile to be installed in a pattern, such as a standard herringbone, the first item to be verified is the size of the narrow end of a rectangular tile in relation to the long side. Place several narrow end tiles perpendicular to the long side until reaching the end of the long-side tile. If the first and last tiles are flush with each end and the tiles in between are tightly stacked, the tile is not modular and should not be considered. If the tiles are placed in a similar fashion to the above and there are equal spaces for grout joint, this tile is modular and can be installed with slight joint width adjustments to accommodate the naturally occurring differences in a calibrated tile. Additionally, the space in between the perpendicular tiles will also be the grout joint size for the project.
As seen in the attached image and, it appears to be okay, but a closer look demonstrates the problem. The long side grout joints do not align. Since the tile installed here is not modular with the narrow ends being too wide, the grout joints are pushed to the right. In this case, the tile is running or creeping to the right and even the best efforts to bring it back to the layout line are futile. The only adjustment that can be tried is to make the grout joint size on the long side narrower. This may help the long side joint alignment, but the irregular joint sizes will be very evident to the end user and the installation will most likely be considered a failure.
Learn more about tips and best practices for flooring layout
To alleviate this situation, the installer needs to take the lead in this process. When the tile is selected, the installer should “dry lay” the actual tile to be installed on a flat surface, as directed above, for the consumer and/or designer to view. If equal-sized grout joints are seen, the job is good to go only after getting written approval from all involved parties. If not, a different tile needs to be selected. At this point, the installer should not submit to the pressure of those involved saying, “You are the tile professional; you should be able to make this work. Right?” The preliminary legwork may seem beyond the duties of the installer, however, if the installer installs the non-modular tile, he or she will most likely bear the cost of the replacement. Think about it before saying, “Okay, I will give it a shot.”
Looking for a reprint of this article?
From high-res PDFs to custom plaques, order your copy today!