Letters From the Mailbag: Heat-Weld Troubleshooting
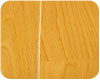
A properly grooved seam, like the one shown here, is cut one-half to two-thirds the thickness of the material with the full radius intact.
My column in the June 2009 issue on heat welding generated some very interesting questions from National Floor Trends readers. Here is a sampling of the questions, and some of my responses. Remember: Knowledge is important to eliminate callbacks and job failures.
Q: Can you tell me what a good grooved seam looks like?
A: A seam’s width and depth both can vary. Weld rods can be 3mm, 4mm, 5mm, and 6mm, so the width of the groove should match up with the size of the rod. Next, the depth of the groove should be measured. Manufacturers want the groove to be one half to two-thirds the thickness of the wear surface for materials with a felt or fiberglass backing. If the material were vinyl-backed, on the other hand, the depth would be one half to two-thirds the thickness of the material. For linoleum, the depth is to be down to, but not into the jute backing. It is imperative to have a radius at the bottom of the groove. The radius will give additional strength to the seam.
A properly grooved seam, like the one shown here, is cut one-half to two-thirds the thickness of the material with the full radius intact.
A: Ever since manufacturers have gone to urethane coatings there has been a problem of obtaining a good thermo-fusion weld without scorching or leaving a shiny line on either side of the weld. Installers are turning down the temperature of the welder and the weld at the wear surface appears to be good, but often the weld at the base of the groove is poor. After several months, the seam starts to open up and you are left trying to figure out why the weld failed.
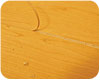
A good test is to go where the seam is opening and pull on the rod. If it “zippers out” you have a poor weld. With a properly welded seam it should be extremely difficult to pull out and in most cases the rod will break.

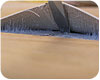
A range of weld tips are available – make sure you use the right one for the job.
A: Adjust the temperature of the heat gun up to the fusion point of the material. This will vary with the type and temperature of the substrate. For instance, a concrete slab will normally be colder than a wood substrate and a suspended concrete will be warmer than an on-grade slab. The use of a weld tip with a narrow pre-heat slot can help solve this problem. (See photo.) The narrow pre-heat part of the tip focuses the heat down into the groove and helps eliminate the excessive hot air wash at the sides of the groove and the shiny, scorching of the material.
Ensure the adhesive is dry before you weld. Otherwise you may get condensation and moisture issues.
A: When a moisture treatment is applied to the concrete slab surface slab, the slab is non-porous. When the adhesive is applied over this coating it must be allowed to set until it is dry-to-touch. This can take a long time because there is no absorbance of the slab’s surface. The adhesive must be totally dry and not just in one spot, but all over. Any trapped moisture will keep the adhesive from totally setting-up.
You can use a fan to speed drying the adhesive, but make sure the airflow is not directly onto the adhesive. Any trapped moisture under the material will impact the quality of the both the bond and the quality of the heat weld. The high heat from the heat welder will create a condensation in the groove at the point of the fusion, if there is moisture available.
If you have any other questions you’d like answered, you can contact me at rthompson@cablespeed.com.
Looking for a reprint of this article?
From high-res PDFs to custom plaques, order your copy today!