How to Avoid Unnecessary Hardwood Flooring Failures

Pic 1: We took a field measurement with our laser set on top of the existing flooring to get a qualitative idea of how far out of flat the flooring was.

Pic 2: The surface of the wood was out 3/4" out of flatness in five feet.

Pics 3-4: Damage to the existing OSB subfloor required us to install a new plywood subfloor.

Pic 5: We used a self-leveling product to get to the proper floor flatness.

Pic 6: In this second case, along the walls, furniture was leaning to the point they had to place shims under the legs of furniture.

Pics 7-8: The flooring was out of flat, up to one inch in 10 feet in areas.

Pics 7-8: The flooring was out of flat, up to one inch in 10 feet in areas.
In the past few months I’ve inspected more flatness concerns that are costing thousands of dollars in corrective work, and what’s sad is that these could have been avoided. The industry and manufacturers have guidelines for floor flatness, and contractors and retailers should be using them to validate the necessity for proper floor prep when these tolerances aren’t met. In order to maintain warranties, flatness requirements must be met.
Guidelines for flatness from the National Wood Flooring Association (NWFA) are:
Chapter 4: Wood Subfloor Guidelines
Note: Always follow the wood flooring manufacturer’s recommendation for a proper subfloor.
Part III: Subfloor Flatness and Integrity
1. Wood subfloors must be flat, clean, dry, structurally sound, free of squeaks and free of protruding fasteners.
- For installations using mechanical fasteners of 11⁄2” and longer, the subfloor should be flat to within 1⁄4” in 10 feet or 3/16” in 6 feet radius.
- For glue-down installations and installations using mechanical fasteners of less than 11⁄2”, the subfloor should be flat to within 3/16” in 10 feet or 1/8” in 6 feet radius.
2. If peaks or valleys in the subfloor exceed the tolerances specified above, sand down the high spots and fill the low spots with a leveling compound or other material approved for use under wood flooring. However, it is the builder’s or general contractor’s responsibility to provide the wood-flooring contractor with a subfloor that is within the tolerances listed above.
Chapter 5: Concrete Subfloor Guidelines
Note: Always follow the wood flooring and adhesive manufacturer’s recommendation for a proper subfloor.
Part I: Concrete Subfloor Specifications
1. Subfloor must be flat.
- Make sure the concrete slab is flat to the wood flooring manufacturer’s specification. Typically, manufacturers will specify a flatness tolerance of 1/8”in a 6-foot radius and or 3/16” in a 10-foot radius.
- If the slab is out of specification, consider grinding, floating or both. Many high spots can be removed by grinding, depressions can be filled with approved patching compounds, and slabs also can be flattened using a self-leveling concrete product.
- When sanding or grinding concrete, care must be taken to minimize the amount of silica dust produced. OSHA recommends using dust-collection devices, or applying water to the concrete before sanding. Approved respirators may also be used to minimize the amount of silica dust inhaled.
For floating installations, there are several manufacturers that require even more stringent flatness requirements.
Is it lack of education, knowledge and confidence to convey the need for proper floor prep? Is it easier to be the “cheapest” to get the job, or not mentioning floor prep at the risk of losing the job because of the amount of money that it will take to achieve a successful installation? I understand that floor preparation can be costly for the end user, but by not addressing the need for a flat substrate, the contractor/retailer now bear the costs and burden for a failed floor.
The following are two cases of hardwood installations that failed due to being out of flatness and other installation issues.
A 4,000-s.f. hardwood installation of a new home over a wood subfloor on the main level, and a wood and concrete substrate mix in the basement. Right after the home was framed, the homeowner noticed that there was a hump in the wood subfloor between the dining room and family room. The response from the general contractor was that the blame went to the foundation cement contractor. The problem was, the foundation was never corrected prior to the framing contractor installing the joists. The flooring contractor came in to do the install and was told that the subfloor “is what it is”, and to install over the hump. Rather than refusing to install, the installation of hardwood flooring proceeded. The homeowner had concerns from the beginning of their build with the flatness of the subfloor. There were some other installation issues which ultimately led to a replacement.
When we got involved with the project we were told about the frustration of the hump in the floor. We took a field measurement with our laser set on top of the existing flooring to get a qualitative idea of how far out of flat the flooring was (Pic 1). We found that the surface of the wood was out 3/4” out of flatness in five feet (Pic 2). Once we removed the hardwood flooring we verified that the subfloor was actually one inch out in a five foot radius.
To correct the subfloor, it required removal of subfloor and corrections to the joists, which should have been addressed at the time the home was being framed. The general contractor, the flooring retailer/contractor and even the homeowner took part in the cost of the corrective work. Should the homeowner have been responsible for some of the costs? No, but in order to remedy the concerns, they decided to contribute just to get to a properly installed floor.
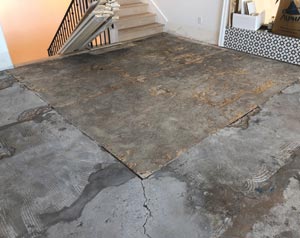
In the basement, there was an area that had Oriented Strand Board subfloor which tied into the concrete (Pic 3). During the removal of the previous hardwood floor, there was damage to the existing subfloor which required us to install a new plywood subfloor (Pic 4). The concrete sloped away from the wood subfloor area by a half-inch in 8’. The original flooring contractor used a patching compound and floated out approximately two feet, which still didn’t meet the industry or manufacturer requirements for floor flatness. We used a self-leveling product to get to the proper floor flatness (Pic 5).
In this second case, this existing home originally had carpet and cushion installed wall to wall. The homeowner purchased the home and decided to install a hardwood floor. The upstairs subfloor is wood and the main level is on grade concrete slab. The hardwood flooring, 1,300 square feet, was a factory-finished engineered wood. The flooring contractor started the removal of carpet/cushion, and the homeowner noticed that there were cracks in the concrete and that around the perimeter there was a lot of unevenness. The reason for the unevenness at the perimeter? The foundation concrete was placed first and the slab was placed to the foundation footings. The slab placement ended up being lower than the foundation footings. The flooring contractor told the homeowner not to worry, they would grind and patch where needed and that they would make it perfect.
The hardwood installed on the second floor upstairs was installed with fasteners with no concerns. The main level installed over concrete was a direct glue down. Immediately after the installation, the homeowner noticed that the floor didn’t feel flat and when they started moving in their furniture, along the walls, furniture was leaning to the point they had to place shims under the legs of furniture (Pic 6). Using a laser to check for qualitative flatness, we found that the flooring was out of flat, up to one inch in 10 feet in areas (Pics 7-8). We noted hollow voids randomly throughout that displayed movement.
See more on flooring installation
Speaking to the homeowner, they were aware that the concrete subfloor had concerns and stated that the flooring contractor didn’t communicate to them that they required more extensive floor preparation.
The takeaway from all of this is you have a choice. Don’t take responsibility for the deficiencies from the other construction trades and make them yours.
Looking for a reprint of this article?
From high-res PDFs to custom plaques, order your copy today!


