Shower Tile 101: Building a Knockout Niche

Photo: Joe Hendrickson/iStock/Getty Images Plus via Getty Images.
A shower niche is designed to provide a handy place to store shampoo, cream rinse, body wash, or other products used in a shower. As such, it should also provide a pleasing appearance in the overall layout of the wall tile with grout lines that align both horizontally and vertically.
This conversation is not focused on badmouthing someone’s work, but rather to help all installers understand what it takes to build a knockout niche. It should be a part of the wall tile layout and adjusted in size to provide a continuous grout joint across the wall, into the three surfaces of the niche, and on through the adjacent wall tile. As seen in the accompanying image, none of these desirable attributes are seen.
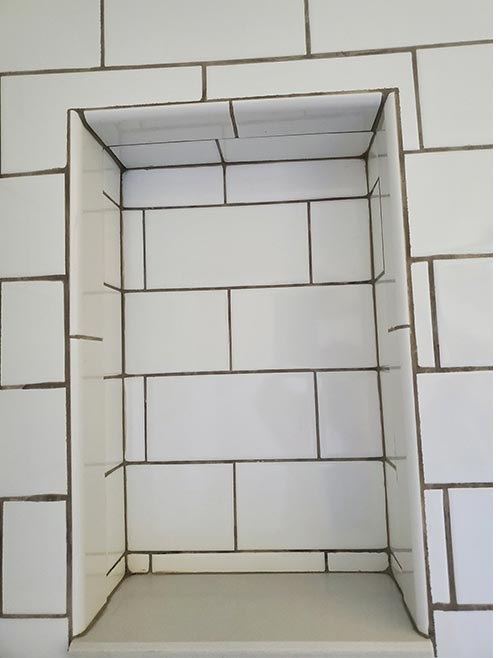
This is an example of what not to do when installing a shower niche; the depth of the niche being approximately six inches, the required slope should have been 1/8”. Photo: Scott Carothers.
One nice feature of this niche is the solid surface material used for the bottom of shelf, but that is where the nice features end. The bottom shelf must slope toward the drain at the rate of ¼” per foot. In this case, the depth of the niche being approximately six inches, the required slope should have been 1/8” rather than being dead level or even worse, sloping toward the back wall.
Whenever possible, adjust the size of the niche to fit within the horizontal wall tile grout joints at the top and bottom. Whether building a custom-sized niche or if necessary, altering a factory-built model, this is critical to obtain an attractive look. As seen here, the top should have been either 1-1/4” higher or 1-3/4” lower to hit the upper grout joint and likewise for the grout joint at the bottom. Using this type of layout eliminates the small cuts inside the niche as well as the unsightly “L” cuts that over time and stress can result in a crack from the 90-degree corner.
Shifting the vertical layout to the right would eliminate the sliver cuts on the right side of the niche while widening the opening to two full tiles would have worked nicely. Primarily, the size of the niche would be determined by the tile contractor collaborating with the consumer, but good suggestions from the tile installer can reap visual benefits.
The available bullnose size for this job was 3” x 8” with the round edge being the 8” side. For the grout joints to flow continuously, the bullnose needs to be cut and sanded to align with the 3” side of the field tile. Similarly, the bullnose needs to be cut to match the grout joint(s) at the top of the niche.
Lastly, a few moments spent on sanding the field tile cuts against the bullnose adds a finishing touch to a quality installation.Looking for a reprint of this article?
From high-res PDFs to custom plaques, order your copy today!


