How to Test Relative Humidity in Concrete Slabs Using In-Situ Probes
Performing a relative humidity (RH) test on a concrete slab using in-situ probes requires several precise steps to capture accurate measurements and ensure your final flooring results will look great and last.
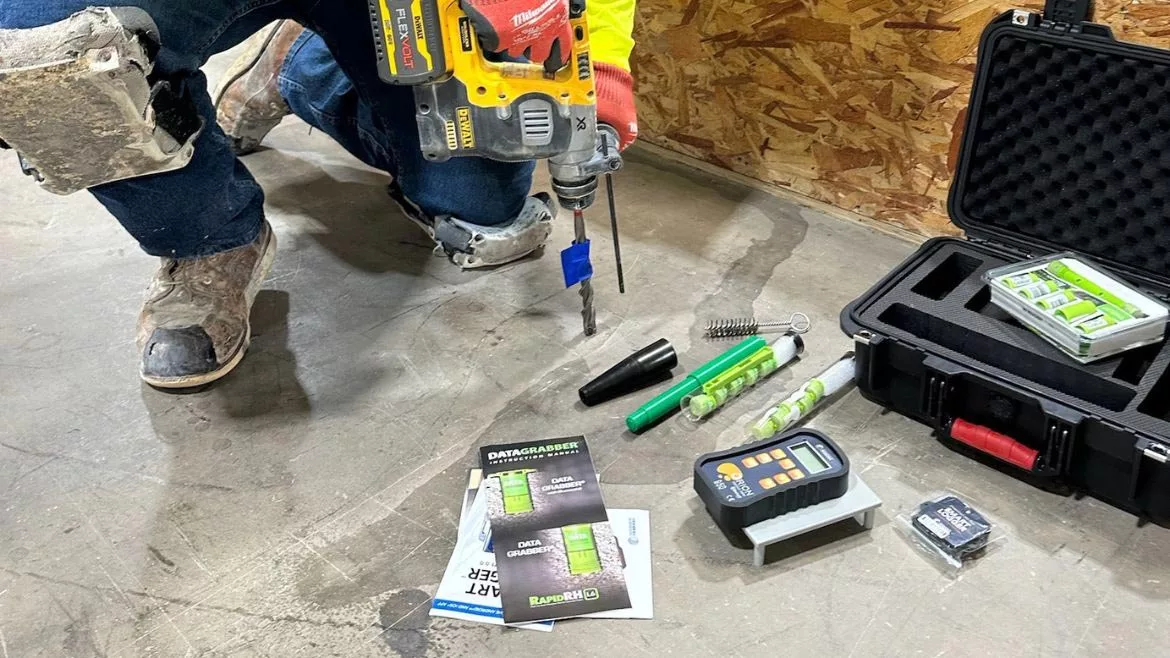
Photo: INSTALL.
Performing a relative humidity (RH) test on a concrete slab using in-situ probes requires several precise steps to capture accurate measurements and ensure your final flooring results will look great and last. Here's the step-by-step process we use at INSTALL that follows ASTM F2170 guidelines, plus a few expert tips from our instructors to help you get reliable RH measurements.
PREPARATION
The first two steps of RH testing are preparatory and should be completed before any sensors or RH probes are installed.
Step 1: Prepare your test site and equipment. Before you begin the RH test, confirm that your test method and equipment meet specifications. (ASTM F2170 provides dimensions and requirements in Section 6.) Each hole must have a liner that isolates the sensor from ambient conditions, and sensors must have NIST-traceable calibration. Some calibration restrictions may apply, so read the standard carefully to be sure your test equipment qualifies. Reusable sensors should be calibrated by the manufacturer at least once per year, or more if exposed to conditions that may impact their accuracy. ASTM F2170 requires that each probe be calibrated within one year after initial use and that calibration be verified within 30 days before use. For jobsite conditions, Section 9 of the standard requires the slab and the ambient air above to be at service conditions for a minimum of 48 hours before testing.
Step 2: Map your sensor count and location. ASTM F2170 requires three test holes for the first 1,000 square feet and at least one additional hole for each additional 1,000 square feet. To ready the slab, make sure the surface is clean and free of debris.
Pro Tip: Know the required depth of the test holes before you start. Test hole depth is not fixed. It must be calculated based on slab thickness and the number of drying sides. If the slab is only drying from one side, drill the hole to a depth of 40% of the slab thickness. If it’s drying from two sides, drill the hole to a depth of 20% of the slab thickness.
RH TESTING & REPORTING
Remaining steps are instructions for proper installation and use of the RH test method.
Step 3: Drill and prepare the test holes. Each test hole must be drilled to the appropriate depth determined during preparation. Holes must be drilled dry and perpendicular (90°). Do not use water for cooling or lubrication, as this can affect the test results. For most RH testing systems, drilling and preparing the test holes also includes cleaning any debris out of the holes, inserting the necessary liner into the hole, and fully lining the hole to meet the ASTM standard.
Step 4: Insert the RH sensor. Follow your testing equipment manufacturer’s directions for inserting sensors into the test holes. If you are using the Rapid RH, each Smart Sensor should be inserted in the test hole and remain in position for the duration of testing. Each hole should be capped and sealed according to the manufacturer’s instructions during equilibration.
Pro Tip: For precise tracking and certification, place the serial number decal of each sensor with the corresponding test hole on your mapped report.
Step 5: Equilibrate the sensors for 24 hours before taking your initial reading. ASTM F2170 requires each sensor to equilibrate for 24 hours (reduced from the previously required 72 hours) before a documentable reading can be recorded.
Pro Tip: The Rapid RH has been shown to provide readings within 3% of the final RH value within one hour of sensor insertion. This will not be valid for ASTM compliance but can provide a target timeline for schedule decisions or for choosing alternate adhesive or flooring options with higher moisture tolerances.
Step 6: Take the RH readings after 24 hours. Record an initial RH reading for each sensor and verify that the reading does not drift more than 1% over five minutes. If the reading drifts more than 1% within that time, it could indicate several potential issues, such as a calibration problem, environmental changes, sensor degradation, moisture ingress, or interference. Whenever you encounter drift, it's important to investigate the cause, and if necessary, recalibrate or replace the sensor to ensure accurate measurements.
After the initial reading, readings can be updated at any time with two conditions in mind:
Equilibrium moisture conditions. Ensure the concrete slab has reached equilibrium moisture conditions before taking subsequent readings, allowing sufficient time after installation or any significant changes in the environment for moisture levels to stabilize within the slab.
Stability of conditions. Make sure conditions within the concrete slab and its surrounding environment are stable. Fluctuations in temperature, humidity, or other environmental factors can affect the moisture content of the slab and lead to inaccurate readings.
Equilibrate a minimum of one hour in each test hole before taking another reading. If using the Rapid RH, additional readings can be taken immediately because the sensor remains installed in the test hole and is therefore fully equilibrated at all times.
Use a checklist to record and report the RH readings. Section 11 of ASTM F2170 details the requirements for the report, including the test hole location, dates and times of measurements, RH reading, temperature reading, and other conditions that might impact results.
Step 8: Interpret the results and re-test if necessary. Before applying a protective coating or other flooring material to a concrete slab, it’s critical to ensure the moisture level inside the slab has decreased to acceptable levels, typically: ≤75% RH, 3 lbs/1000 sq. ft./24 hours MVER, or ≤5% moisture content (MC). To provide fair and impartial findings, some flooring contractors hire a third party to conduct RH testing and offer clients additional peace of mind. Meeting the required acceptable RH level for the specified material is essential for achieving a beautiful, long-lasting floor.
When RH results are not within the required limits for your flooring material, a number of culprits beyond the concrete slab itself may be to blame. For instance, the area surrounding the location may not be properly graded or the drainage system may be inadequate. Other potential causes include gutter systems, vapor barriers, and external sealants that are either missing or not properly installed. Whatever the cause, testing should be repeated until satisfactory results are achieved to avoid any moisture-related causes of flooring failure like mold, warping, and whitening (efflorescence).
Check out more flooring and tile installation how-to's!
Final Pro Tip: Familiarize yourself with ASTM F2170 and choose the best concrete moisture test method for the job. ASTM standards are established to ensure standardized best practices that protect both the installer and the consumer. RH testing provides the best way to capture accurate concrete moisture measurements and deliver professional results.
Looking for a reprint of this article?
From high-res PDFs to custom plaques, order your copy today!


.webp?t=1690771780 "Ultimate_Carpet_Manufacturing_and_Claims_Training_Manual_bleed-2 (2).jpg")